|
Use
the Tech Tips links below to
learn some interesting tips, shortcuts, or special
things to watch out
for when
owning and servicing your BMW automobile. Simple
advice from our
experts that
you can use to take better care of your BMW. Check
back often as this
page is
being updated frequently!

 Sludge
Monster
Sludge
Monster
Safely
Jump Starting
your BMW
BMW
Model Codes
BMW
Engine Codes
Heel/Toe
Downshift
 We've all probably seen an
engine that's been consumed by the "sludge monster".
It's not a pretty
sight and has been the cause of death of many
engines. The first clue
that an engine has been inhabited by the sludge
monster usually becomes
evident during an oil change (when the thick goo
dribbles out the oil
pan drain hole or nothing at all comes out). We
usually identify the
fatal cases of sludge monster victims after the
vehicle arrives at the
shop under the auxiliary power of a tow truck.
We've all probably seen an
engine that's been consumed by the "sludge monster".
It's not a pretty
sight and has been the cause of death of many
engines. The first clue
that an engine has been inhabited by the sludge
monster usually becomes
evident during an oil change (when the thick goo
dribbles out the oil
pan drain hole or nothing at all comes out). We
usually identify the
fatal cases of sludge monster victims after the
vehicle arrives at the
shop under the auxiliary power of a tow truck.

Contaminants
are deadly enemies of an engine. They enter with the
air flow and are
also generated by the friction of metal against
metal. These facts may
astound you: for every 100 gallons of gasoline
burned in an engine, the
following by-products are produced:
90 to 120 gallons of water
3
to 10 gallons of unburned gasoline
1/2
to 3 pounds of soot and carbon
1/4
to 1 pound of varnish
1
to 4 pounds of sulfuric and nitric acid
A measurable percentage of these by-products ends up
in the motor oil.
Detergents and dispersants in the oil must be able
to keep most of
these con-taminants neutralized or suspended in the
oil as microscopic
particles so they don't form sludge, damaging
deposits and corrosion.
When the waste materials are dispersed properly in
the oil, the filter
can trap the larger particles. During an oil change,
the contaminants
too small to be filtered are re-moved with the
engine oil. It's
important to note here that good air filters and
good oil filters trap
more contaminants than lesser quality filters,
making the oil's job
easier.
Sludge formation begins when the chemically
suspended particles of
contaminants begin to settle out of the oil. It's a
fairly daunting
task for engine oil to suspend all the contaminants
thrown at it, and
any engine oil can do this successfully to a point.
Amsoil, and some
other quality synthetic motor oils, are able to
perform this task more
effectively and for longer periods of time. But
eventually, if the oil
is not changed often enough, a "breaking point" will
be reached. This
breaking point is either when there are too many
contaminants to handle
or when the oil's chemical defenses are weakened,
and it is caused by
two main things: excessive accumulation of
contaminants in the oil and
chemical changes in the makeup of the oil itself
(depletion of the
additives and oxidation).
As more particles are suspended, less of the
additives are available to
do their job. Knowing this makes it easy to see why
too much time
between oil changes can be one cause of the oil
reaching its "breaking
point".
The sludge monster's invitation can be repeatedly
rejected. To keep the
sludge monster looking for a dinner date in someone
else's engine, use
a quality fully synthetic oil in recommended
viscosity and change it at
recommended intervals.
(return to top)
"Jump
starting" should be avoided if possible because of
damage that can
occur to
various electrical components. The electronics
found throughout our
cars can
handle voltages up to 15v but only briefly. Jump
starting equipment
found on
some tow trucks can operate anywhere from 18 to 24
volts. Damage to
certain
electrical components is assured if this equipment
is used.
However, in certain circumstances, jump starting
may not be avoidable.
To
protect the electrical components in your car,
follow the procedure
described
below.
- Make
sure that neither of the vehicles involved are
touching (on certain
vehicles, ground points may exist on bumpers).
- Ensure
that both vehicles have batteries of the same
voltage and are
approximately the same size/strength to ensure
sufficient power for
jump starting.
- Carefully
observing polarity, connect the positive
jumper cable to the battery's
Positive Junction Post (or battery positive
terminal, if the vehicle is
not equipped with a battery's Positive
Junction Post) of the vehicle to
be jumped started and then the battery
positive terminal of the vehicle
being used to jump start. (See below for
picture of Junction Post)
- Next
connect the dead car's negative jumper cable
to a CHASSIS GROUND (i.e..
Bolt at front shock absorber upper mount) on
both vehicles. At this
point, connect the last cable, the negative
for the jumping car to a
CHASSIS GROUND. Doing so avoids any potential
arcing of battery gases,
which could cause an explosion.
- Jump
start the dead vehicle by turning the key as
usual. For the first
attempt, leave the jumping car off.
- If
the car doesn't start on first attempt, start
the jumping car and leave
it running. Wait a few minutes before the 2nd
attempt. If it still will
not jump start, odds are your battery is
completely dead. In this case, contact
us
to have your vehicle towed in so we can
thoroughly check the charging
system and fix the problem.
- If
the dead car successfully starts, before
disconnecting the jumper
cables, switch on the heater fan to the
highest speed, the rear window
defroster and your low beam headlights. This
helps minimize voltage
spikes when disconnecting the cables.
-
Disconnect
the negative cable on jumping car first,
then the negative on the
formerly dead car. Next, disconnect the
positive cables in either
order. Disconnecting the cables in this
order ensures that any
momentary arcing that may occur is away from
the battery (in the case
of vehicles with the battery in the engine
compartment) and any gases
produced by the battery. To prevent future
problems, it is recommended
that you schedule an appointment to have
your battery load tested and
your charging system inspected.
Failure
to follow this
procedure exactly may
result in expensive damage to your vehicle's
sensitive
electronics.
(return to top)
BMW model codes help you to identify your car
in the language that
the manufacturer uses (no, not German!). Using the
codes lets you order
parts
and accessories with confidence. For example E39 is
a 5-series body
from 1996
while E46 is a 3-series body from 98-on.
| E
Code |
Model
Series |
Model
Years |
| E3 |
2500,
2800,
Bavaria, 3.0s/si |
1968-1977 |
| E6 |
1600,
1800,
2000 Touring |
1973-1975 |
| E9 |
2500cs,
2800cs,
3.0cs |
1965-1975 |
| E10 |
2002,
2002tii |
1968-1975 |
| E10C |
2002
Convertible |
1971 |
| E10T |
2002
Turbo |
1973-1975 |
| E12 |
5
Series |
1973-1981 |
| E12/1 |
5
Series Facelift |
1977-1981 |
| E12/1S |
M
Series (M535i) |
1980-1981 |
| E20 |
2002
Turbo |
1973-1975 |
| E21 |
3
Series |
1977-1983 |
| E21/1 |
3
Series Facelift |
1978-1979 |
| E21/2 |
3
Series Facelift |
1979-1984 |
| E23 |
7
Series |
1978-1988 |
| E23/1 |
7
Series Facelift |
1979-1982 |
| E23/2 |
7
Series Facelift |
1982-1986 |
| E24 |
6
Series |
1978-1988 |
| E24/2 |
6
Series Facelift |
1988-1989 |
| E24/1S |
M
Series (M635csi) |
1984-1987 |
| E24/2S |
M
Series (M6) |
1988-1989 |
| E25 |
Turbo |
1972 |
| E26 |
M1 |
1979-1981 |
| E28 |
5
Series |
1982-1988 |
| E28S |
M
Series (M5) |
1985-1988 |
| E30 |
3
Series |
1984-1992 |
| E30/2 |
3
Series Coupe |
1984-1992 |
| E30/2C |
3
Series Convertible |
1986-1992 |
| E30/2S |
M
Series (M3) |
1987-1991 |
| E30/2SC |
M
Series (M3) Convertible |
1988-1991 |
| E30/4 |
3
Series Sedan |
1984-1991 |
| E30/5 |
3
Series Touring |
1998-1992 |
| E30/16 |
3
Series 4WD (325iX) |
1986-1991 |
| E30/88 |
3
Series Facelift |
1998-1991 |
| E30Z |
Z1 |
1989-1990 |
| E31 |
8
Series |
1990-1999 |
| E31S |
850CSi |
1991-1999 |
| E32 |
7
Series |
1988-1994 |
| E32/2 |
7
Series Longbase |
1988-1994 |
| E34 |
5
Series |
1989-1996 |
| E34/5 |
5
Series Touring |
1991-1996 |
| E34/16 |
5
Series Touring 4WD |
1992-1996 |
| E36 |
3
Series |
1992-1999 |
| E36/2 |
3
Series Coupe |
1992-1999 |
| E36/2S |
M
Series (M3) Coupe |
1992-1999 |
| E36/2C |
3
Series Convertible |
1993-2000 |
| E36/2CS |
M
Series (M3) Convertible |
Unknown |
| E36/3 |
3
Series Touring |
1996-1999 |
| E36/4 |
3
Series Sedan |
1992-1999 |
| E36/4S |
M
Series (M3) Sedan |
1995-1998 |
| E36/5 |
3
Series Compact |
1995-1999 |
| E36/7 |
Z
Series (Z3 Roadster) |
1996-2002 |
| E36/7S |
M
Series (M Roadster) |
1998-2002 |
| E36/8 |
Z
Series (Z3 Coupe) |
1998-2002 |
| E36/8S |
M
Series (M Coupe) |
1998-2002 |
| E38 |
7
Series |
1995-2002 |
| E38/2 |
7
Series Longbase |
1995-2002 |
| E38/L7 |
7
Series Limousine |
1999-2002 |
| E39 |
5
Series |
1997-2003 |
| E39S |
M
Series (M5) |
1997-2003 |
| E46 |
3
Series |
1999-Current |
| E46/2 |
3
Series Coupe |
1999-Current |
| E46/2C |
3
Series Convertible |
2000-Current |
| E52 |
Z
Series (Z8) |
2000-2002 |
| E53 |
X
Series (X5) |
2000-Current |
| E60 |
5
Series Sedan |
2003-Current |
| E61 |
5
Series Touring |
Not
Available |
| E63 |
6
Series |
2004-Current |
| E65 |
7
Series |
2002-Current |
| E66 |
7
Series |
2002-Current |
| E83 |
X
Series (X3) |
Not
Available |
| E85 |
Z
Series (Z4) |
2002-Current |
(return to top)
Ever wonder what engine
code your BMW uses? These are the current
codes used.
|
BMW
Engine Codes
|
| Engine
Code |
Cylinders |
Engine
Size |
Applications |
| M10 |
4 |
2
Valve 1.6, 1.8, 2.0 Liter |
1600,
2002,
320i, 318i |
| M20 |
I-6 |
2
Valve 2.0, 2.3, 2.5, 2.7 liter |
323i,
325e,
325i, 528e |
| M21 |
I-6 |
Turbocharged
Diesel |
524td |
| M30 |
I-6 |
2
Valve 2.8, 3.0, 3.3, 3.5 liter |
528i
thru
81 630csi,633csi,635csi, 533i,535i thru 92,
733i,735i thru 92 |
| M42 |
4 |
4
Valve 1.8 liter |
318i/is
90
thru 95 |
| M44 |
4 |
4
Valve 1.9 liter |
318i
96
on, Z3 1.9 |
| M50 |
I-6 |
4
Valve 2.5 liter |
325i
92-95,
525i 91-95 |
| M52 |
I-6 |
4
Valve 2.5, 2.8 liter |
325i
96-99
328i 96-99 |
| M52TU |
I-6 |
4
Valve 2.5, 2.8 liter |
323i
99-00
328i 99-00 |
| M54TU |
I-6 |
4
Valve 2.5, 3.0 liter |
325,
330
01+ |
| M60 |
V8 |
4
Valve 3.0, 4.0 liter |
530i,540i
93-95
740i 93-95 |
| M62 |
V8 |
4
Valve 4.4 liter |
740i
95-99,
540i 97+ |
| M70 |
V12 |
2
Valve |
750il,
850i |
| N62 |
V8 |
4
Valve |
745i
02 |
| N73 |
V12 |
4
Valve |
760i
02 |
| S14 |
4 |
4
Valve 2.3, 2.5 liter |
M3
88-91 |
| S38 |
I-6 |
4
Valve 3.6, 3.8 liter |
M5,
M6 |
| S50 |
I-6 |
4
Valve 3.0 liter |
M3
95 |
| S52 |
I-6 |
4
Valve 3.2 liter |
M3
96-
99 |
| S54 |
I-6 |
4
Valve 3.2 liter |
M3
01+
M Roadster 01+
M Coupe 01+ |
| S62 |
V8 |
4
Valve 5 liter |
M5
00+
Z8 00-02 |
(return to top)
The heel-toe
downshift is a fundamental technique to driving
fast through corners.
During a heel-toe downshift, you'll be steering
with the left hand,
shifting with the right hand, clutching with the
left foot, and working
both the brake and gas pedals with the right foot
-- all at exactly the
same time.

The
downshift begins with a
full throttle acceleration towards a corner.

Lift
the right foot from the
gas pedal and press the brake pedal.
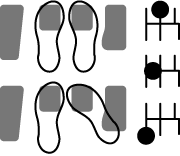
Just
before the braking is
done, the left foot depresses the clutch pedal.
The
right hand begins the
downshift.
The
right foot is still
applying, but easing up on the brake pressure as
the car approaches the
turn-in, then the foot rotates so the heel is
above the corner of the
gas pedal.
As
the shift passes through
neutral, the right heel gives a quick push of the
gas pedal to rev the
engine quickly (the ball of the foot is still on
the brake easing up
even more).
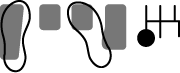
The left foot releases the clutch, the right foot
rotates off the gas.
Done correctly the RPMs generated by the throttle
blip above matches
the RPMs needed, and as the clutch is released the
engine engages
smoothly with the current wheel speed. There
should be no forward or
braking lurch when the clutch is let go.

The
right foot completes the
braking with a smooth release.

The
right foot moves over to
the gas pedal to assume the normal position at
first only to maintain
the pressure needed to sustain the vehicle speed
throught the first
part of the corner. Then pressure is gradually
applied to accelerate
out of the turn.
(return to top)
|